Compatibility
There are many versions of Philips Hue LightStrip now available, and lots have differing connectors. Most versions have 2 different sized connectors, the Control Box socket and the LightStrip Extension connector, making 3 different point to point cable combinations for each of the many versions. That's dozens of different cable combinations, plus splitters, all for different purposes.
Since all of our cables are made to order, please double-check the diagrams and description to be sure that this cable is compatible with your specific lightstrip, setup and needs before purchasing.
Since all of our cables are made to order, please double-check the diagrams and description to be sure that this cable is compatible with your specific lightstrip, setup and needs before purchasing.
End of Cut LightStrips
>
Start of Cut LightStrips
Other Cables
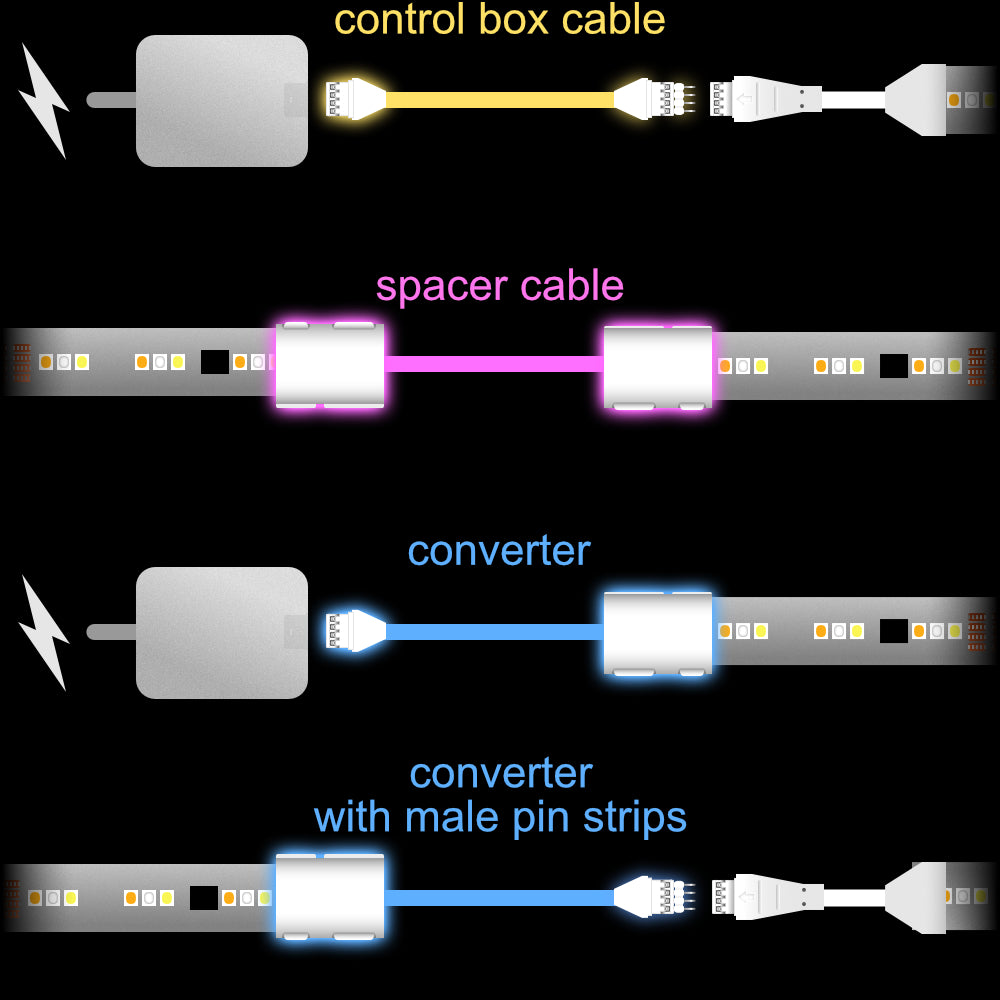
This is a custom-made Spacer or 'Blanking' Cable for the Philips Hue Flux LightStrip (produced from late 2025, and can display multiple colours at once). It will link two cut sections of LightStrip, providing space in between. This does NOT connect to the Control Box.
There are multiple scenarios for which these can be used. For example, you may want to light under a set of kitchen cabinets and need a blank area around an extraction unit. This provides the cable and space in between.
This extension is made with the proper gold-plated connectors for the Philips Hue Flux LightStrip system giving you perfect performance, and lasting reliability.
Dimensions
< Choose the Length >
All of these cables are made to order, to the exact length you need. If the size you need is not in the options, just purchase a length that will accommodate the length you would like, then drop us a note with your exact specification.
These cables will work fine for most setups, but for some longer length lightstrips there the may be difficulty. There isn't a 100% formula as to what will and work work for each setup, this is one of the reasons you can return these free of charge if they don't work for your particular Setup.
These cables will work fine for most setups, but for some longer length lightstrips there the may be difficulty. There isn't a 100% formula as to what will and work work for each setup, this is one of the reasons you can return these free of charge if they don't work for your particular Setup.
Fitting Instructions
2. Where appropriate for you, cut the lightstrip directly across the cut line.
3. Make sure the snap connector is on its back, with the curved side face down.
4. Open the small clip (with the small led symbol).
5. Push the upside-down lightstrip onto the connector, being careful to make sure the pins do not go under the contacts on the lightstrip. Most of the time, this will go on without issues. Occasionally, they may need reseating.
6. Close the clip with a firm snap.
Unlike 6-pin lightstrips, 4-pin lightstrips will only work in one direction. This can easily be identified by the larger black chip. The larger black chip sits towards the back end of the cut section. The start end of the lightstrip doesn't have this chip. You cannot connect 2 starts or 2 ends together.
7. When your setup is complete, plug the LightStrip back in. At this point, the Lightstrip will calibrate, and you should see the connected sections light up. If a section doesn't work, the snap-on connector may need reseating. Before doing that please power off at the wall. Once it's all done, sit back and bask in the light.